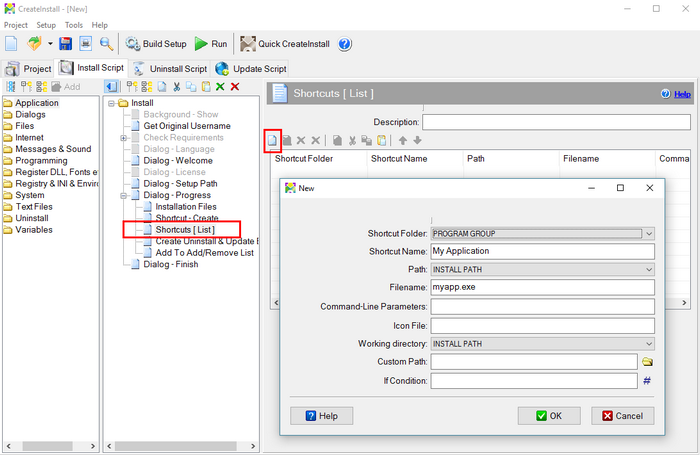
How to create shortcuts
You can use the Shortcut - Create or Shortcuts [List] commands to create shortcuts for your application . They differ in that the Shortcut - Create command can only create one shortcut, but the Shortcuts [List] command allows you to specify a list of shortcuts. In addition, the first command has more options, such as Run as and Run as Administrator. In most cases it is convenient to define all shortcuts in one command.

New shortcut
You need to specify the folder, where the shortcut will be created, in Shortcut Folder parameter . PROGRAM GROUP - the folder with the name of your application in the Applications menu, for example, Start - Programs - My Application. If you want to create a shortcut in another subfolder, you can specify this subdirectory in the Shortcut Name parameter. For example, if you want to create a shortcut in the Start - Programs - My Application - Tools, then specify
Shortcut Folder: PROGRAM GROUP
Shortcut Name: Tools\My Tool
Often there are situations when you have several programs, but you want that all shortcuts are created inside a folder called My Company. In this case, select CUSTOM PATH, and specify the full path in the Shortcut Name as in the example below.
Shortcut Folder: CUSTOM PATH
Shortcut Name: #progpath#\My Company\My Application\My Application
By default, the shortcuts are only created for the current user, but the Shortcut Folder has items to create shortcuts for all users. For example, COMMON PROGRAM GROUP, COMMON DESKTOP etc.
Fields Path and Filename are used to indicate the file to be run when the shortcut is launched. It is not necessary to specify the executable .exe file, you can specify the directory name, URL address, PDF or MS Office file etc. In this case, when you launch the shortcut, it opens the specified directory, opens the site in the browser or opens the document in the corresponding application.
Path: INSTALL PATH
Filename: myapp.exe

Path: INSTALL PATH
Filename: Subfolder\myapp.exe

Path: CUSTOM PATH
Filename: #setuppath#

Path: INSTALL PATH
Filename: GetStarted.pdf

Path: CUSTOM PATH
Filename: http://www.createinstall.com
By default, Windows displays shortcuts with the icon of the executable file or the icon of the appropriate application. You can specify a different icon for your shortcut. Suppose you have a file myicon.ico, which you want to use as the shortcut icon. At first, you have to include this file in the installation. The easiest way is to place the icon file in the same directory as the executable file and make sure that it is compressed into your installation. In this case, it is enough to specify only the file name in the Icon file field.
Icon File: myicon.ico
Do not enter the absolute path to the .ico file on your computer in the File icon parameter! It will not be automatically included into your installation, and the shortcut will have the correct icon only on your computer.
You can speciify the working directory for your application in the Working directory and Custom Path fields. As a rule, the working directory should be equal the directory of the executable file.
Working directory: INSTALL PATH

Working directory: INSTALL PATH
Custom Path: subfolder

Working directory: CUSTOM PATH
Custom Path: #appdata#\My Application
