Example of use of the dialog function
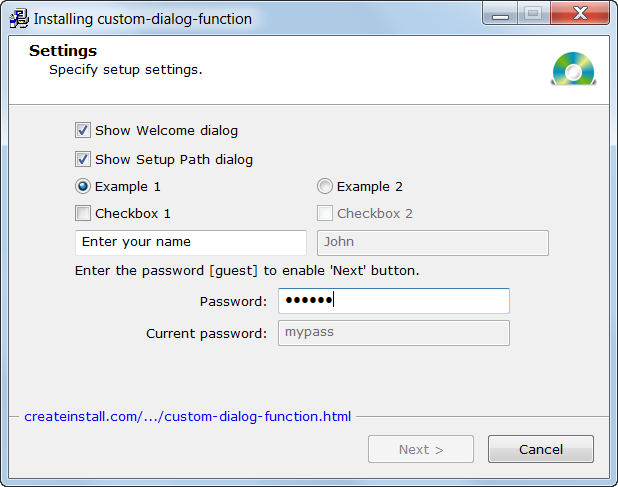
Basic user interaction during the installation of a program occurs through dialog windows, which you define in the project in the CreateInstall installer. All dialog windows are created with standard Windows and have standard elements, such as edit fields, buttons, text, lists, etc. It may sometimes become necessary to handle some events resulting from dialog elements independently. You can install your own event handler in any dialog window. We will install our event handler in Dialog – Settings. Let’s look at a very simple example: we need to create a dialog window with two radiobuttons – every button is connected to its checkbox and entry field. When the radiobutton is selected, the corresponding checkbox and entry field are available for changes, and when the radiobutton is not selected, its checkbox and entry field are gray and cannot be changed. For this example, let’s also add to our dialog window a password entry field, which we define beforehand, and we will simultaneously display all characters entered into this field in another element. The user can press the Continue button only if he enters the correct password and username in the edit field under the selected radiobutton.
First we need to add the command Dialog – Settings and place necessary elements there. You can read more about how to do this in the article How to use the command Dialog – Settings. We should get the following dialog as a result.

It should be noted that an already working element is presented here.
Now let’s work on direct definition of our function. First, read the article How to define a custom dialog function. We copy the entire source code into a separate file custom.g and attach it to our project through the Source code command.
External Source Code: Checked
Source Code: include : $"$prjpath$\custom-dialog-function\custom.g"
You can find the file custom.g in the subdirectory custom-dialog-function in the folder where our project itself is located. Open it in any word processor. First you will see identifiers of necessary elements (see the article How to get Control ID). The most important function for us is mydlgsetscmdproc, where all events are handled. We need to add the name of this function to our command Dialog – Settings as the value of the parameter Dfunc.
We will handle the radiobutton press and make the corresponding elements active or unavailable in the fragment below. Additionally, we will call this function during initialization of the dialog window (case $DLGINIT). There are therefore additional checks connected with edit fields and password entry during initialization.
     case $RADIO1, $RADIO2
      {
         if  codedlg == $BN_CLICKED : myenable( wnd )
      }
...
   case $DLGINIT
      {
         uint ret = dlgsetscmdproc( wnd, id, ctl, codedlg )
         macrox_getstr( "defpsw", defpsw )
         myenable( wnd )
         return ret
      }
Event handling from edit fields and password entry fields also occur in our function.
     case $EDIT1, $EDIT2
      {
         if codedlg == $EN_SETFOCUS : myfocus( GetDlgItem( wnd, id ))
         if codedlg == $EN_KILLFOCUS : mychange( GetDlgItem( wnd, id ))
      }
      case 0xc8c
      {
         if codedlg == $EN_CHANGE : mypsw( wnd )
      }
Let’s look in more detail at the function mypsw. In it, we check the entered password against the correct password, the variable defpsw, and also double the entered password in a different edit field. The password is defined in a common script variable “defpsw” and is assigned to the string variable defpsw upon initialization of the dialog $DLGINIT. If the entered password is correct then the Continue button will become active.
func mypsw( uint wnd )
{
   str psw
   win_gettext( GetDlgItem( wnd, 0xc8c ), psw )
   win_enable( GetDlgItem( wnd, $IDC_NEXT ), psw == defpsw )
   win_settext( GetDlgItem( wnd, 0xc8e ), psw )
}
In conclusion, let’s look at additional handling upon pressing the Continue button. For complication of a task, we check that the user specified a username in the active edit field, which is located below the selected radiobutton. We receive the edit field’s identifier in idedit, and write the value specified by the user in the variable curname. If it is equal to the value by default or empty, we display a warning message and cancel continuation to the next stage.
 case $IDC_NEXT
      {
         uint idedit first = wcheck_get( GetDlgItem( wnd, $RADIO1 ))
         str  curname

         idedit = GetDlgItem( wnd, ?( first, $EDIT1, $EDIT2 ))
         win_gettext( idedit, curname )
         if curname == macrox_get( "default_text" ) || !*curname
         {
            msg_warning( "#warningmsg#", "#lcaption#" )
            SetFocus( idedit )
            return 0
         }
      }
You can download the project and file with source code in the file custom.g and look to see how it works in practice. The amount of additional code is not large and understandable even for a beginning programmer. In the given example we handled only basic events, which might be necessary in your projects, but a similar method can be used to handle other events resulting from dialog elements as well. You can also see default handlers for all dialog windows in subdirectory CreateInstall\cmds\sources in files with the names dlg*.g.
![]() Download the example project custom-dialog-function.ci
Download the example project custom-dialog-function.ci
